Interface #
When you click on the “Preview” of the brush from the Brush Collection, a new window will open, giving you access to the Advanced Brush Settings. This powerful toolset allows you to unleash your creativity, offering complete control over every detail of your brushes. From texture and pressure sensitivity to dynamic stroke behavior, you can fine-tune each aspect to ensure that your brushes respond naturally to your unique artistic style. Whether you’re refining an existing brush or creating one from scratch, these advanced settings provide a truly personalized drawing experience in StylusX.
Top Panel #
located at the top bar, you’ll find several important options to manage your brush settings:
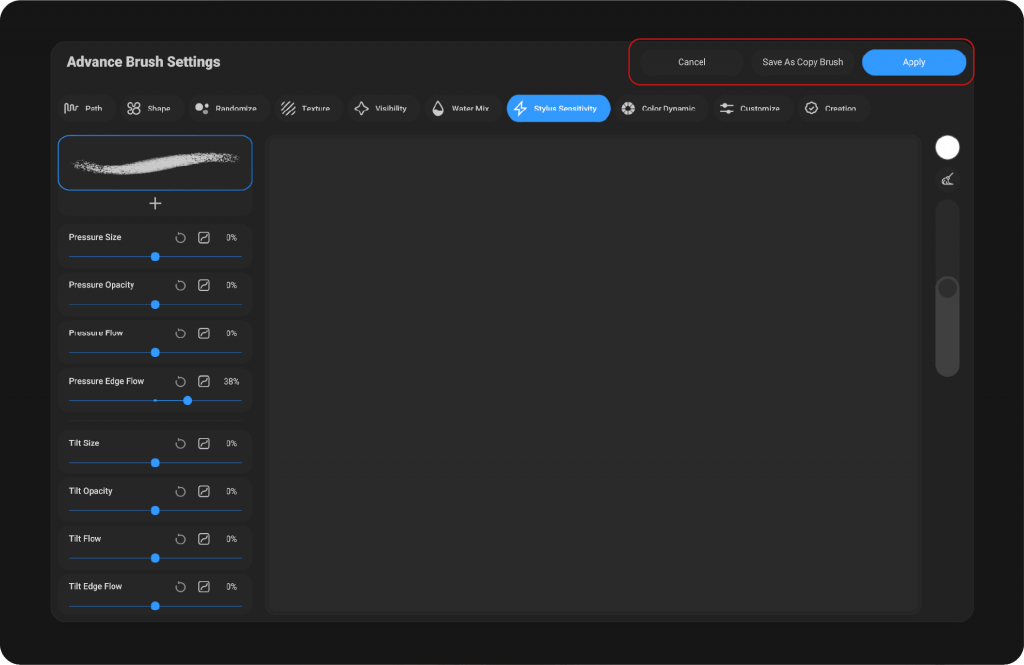
Save As Copy Brush: This option allows you to save the current brush settings as a new copy, leaving the original brush unchanged. It’s a great way to experiment with different settings without modifying the default brush.
Apply: Clicking this button will save all the changes you’ve made to the brush settings. Any adjustments you’ve applied will now take effect.
Cancel: Pressing this button will discard any changes you’ve made during your session. The brush settings will remain as they were before any adjustments were made.
Brush Settings Categories #
The Brush Settings Categories provide precise control over how your brush behaves and interacts with the canvas. With 10 specialized sections, you can fine-tune every aspect of your brush, from its shape and texture to its dynamic response to pressure and movement. Whether you’re adjusting stroke behavior, customizing textures, or refining color dynamics, these settings offer endless possibilities for artistic expression.
Settings #
Each Brush Settings Category offers a range of intuitive controls, including sliders and toggles, allowing you to fine-tune various aspects of your brush.
When selecting a category from the left menu, you’ll access a dedicated set of adjustable parameters tailored to that specific attribute. These settings enable precise customization, ensuring your brush responds exactly as you envision.
Testing Pad #
The Testing Pad allows you to manually test your brush settings by drawing on a dedicated preview area. After making adjustments, you can use the pad to see how the brush behaves before applying it to your artwork.
Types of Settings #
In the Brush Settings, you will find various modes of adjustment for different attributes. These include sliders for smooth, intuitive control over values, numeric inputs for precise value entry, and curves that let you fine-tune dynamic responses. Each method offers unique ways to refine your brush’s behavior, allowing for a truly customized painting experience.
Sliders #
Sliders allow you to adjust settings smoothly by dragging a control point along a scale. This offers a visual and interactive way to modify brush attributes, such as size, opacity, or spacing. The slider provides real-time feedback as you adjust, making it easy to find the perfect setting for your needs. It’s perfect for adjustments that need a gradual change or fine-tuning.
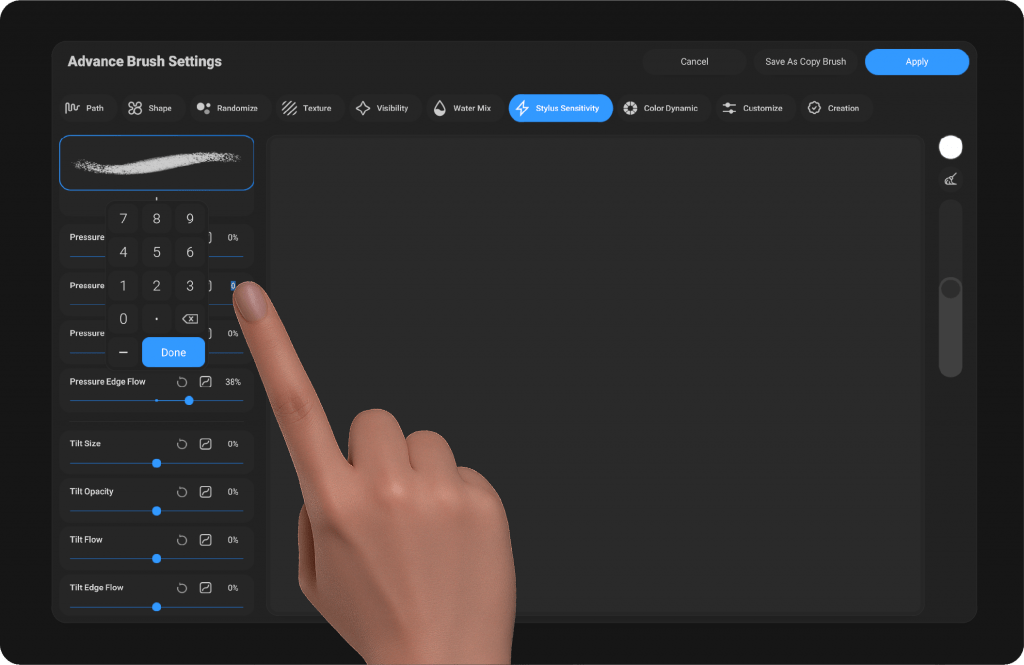
Numeric Input #
Numeric input allows for precise control over a setting by typing in a specific value. This method is ideal when you need exact numbers or when fine adjustments are required. It’s especially helpful for settings that require a high degree of accuracy, such as brush spacing or opacity levels, where even small changes can make a noticeable difference.
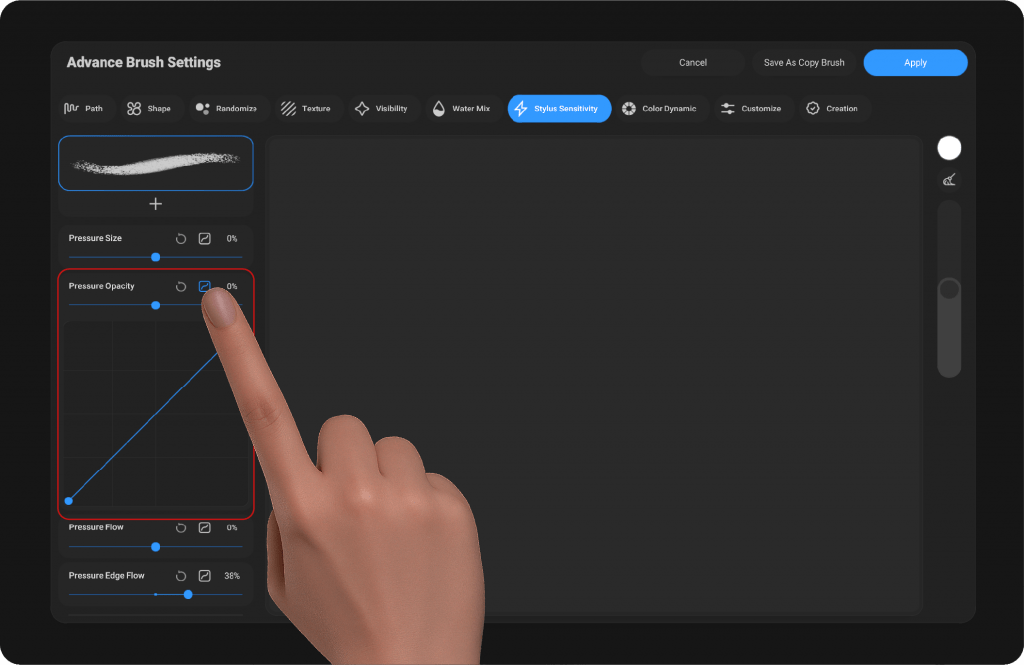
Curves #
Curves provide a way to control how a setting behaves over a range. By manipulating the curve, you can influence the dynamic response of your brush in more complex ways, such as controlling pressure sensitivity or altering the brush’s behavior as you paint. This method is perfect for more advanced users who want to create intricate brush dynamics based on specific input patterns, like pressure or tilt.
The Settings #
The Brush Settings in StylusX offer a comprehensive set of tools to fine-tune every aspect of your brush’s behavior. Whether you’re adjusting the texture, shape, or dynamics, each setting is designed to give you total creative control. Below is a detailed breakdown of the settings available for each category:
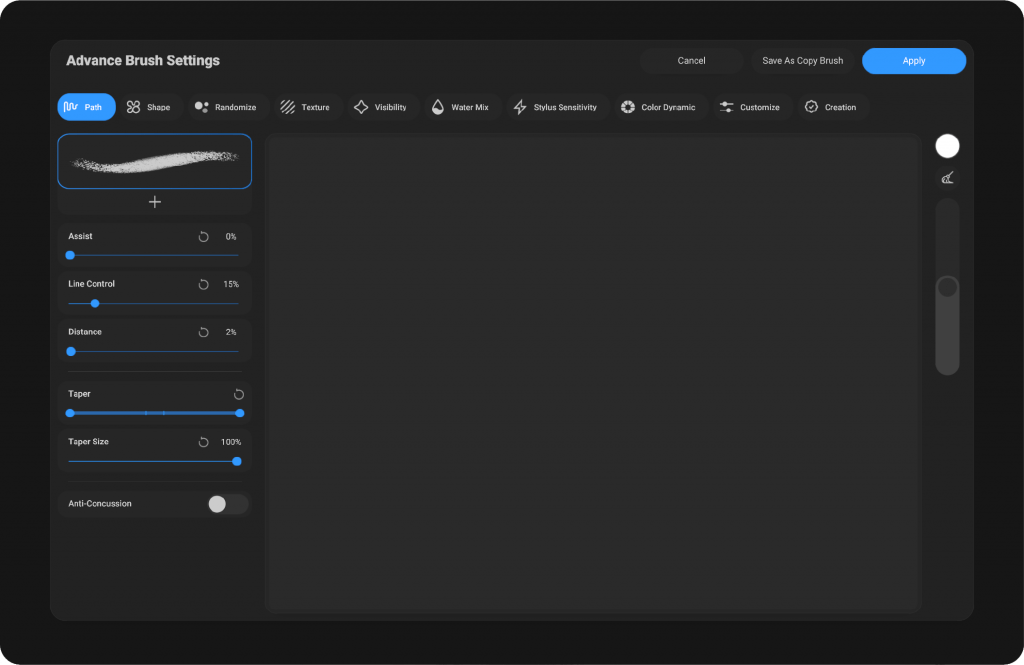
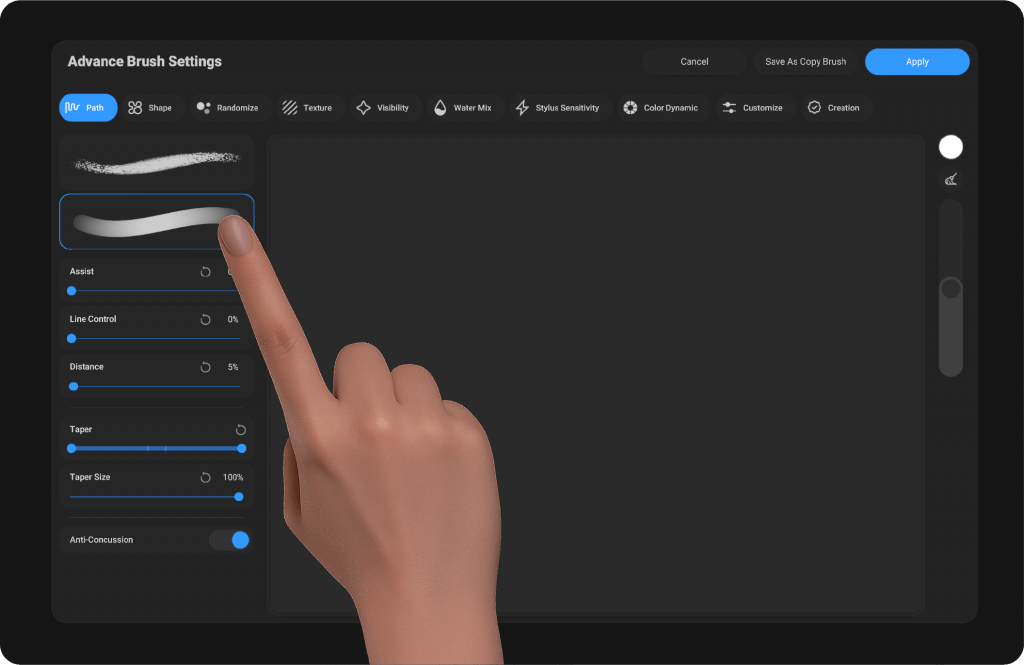
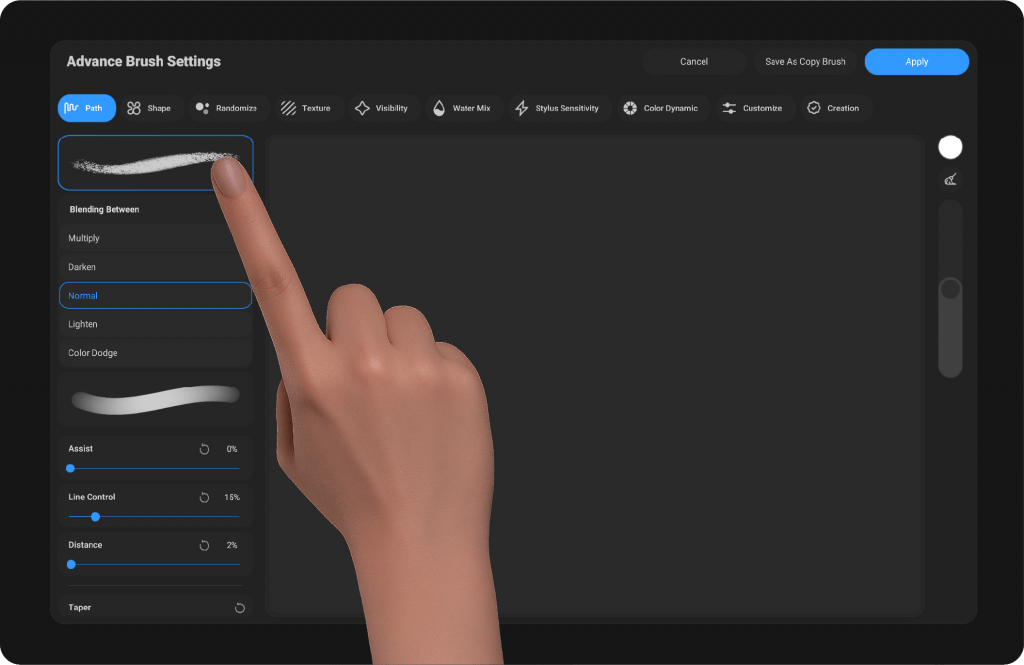
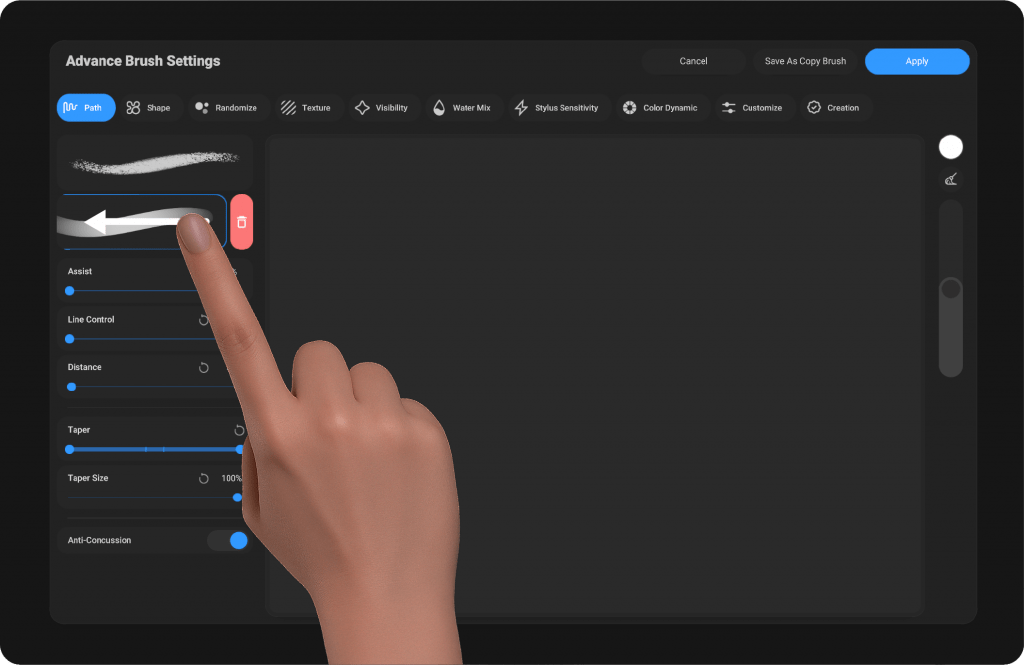
Path #
Assist #
This option provides dynamic support while using the brush, helping you maintain smoothness and precision during your strokes. With Assist enabled, the brush responds more fluidly to subtle movements of the stylus, resulting in more accurate and refined strokes. It’s particularly useful for detailed drawings, reducing errors that can happen with less steady hand movements.
Stabilizer #
The stabilizer is a tool used to steady the movement of the pen or brush while drawing. When enabled, it minimizes the effect of shaky or unsteady hand movements, resulting in smoother, more controlled lines. The stabilizer is especially helpful for intricate work or when fine details are required, offering increased control over your strokes.
Distance #
This setting determines the distance between the points that the brush follows along the path. A larger distance allows the brush to move faster along the path. It lets you draw longer, smoother lines quickly or with greater precision, depending on your needs. This setting controls the speed and responsiveness of the brush based on the space between the points.
Taper #
The Taper setting is controlled via a slider at both ends, allowing you to adjust the thickness of the stroke dynamically. By adjusting the sliders, you can control how the stroke starts and ends, creating a smooth transition between thick and thin lines. This feature is ideal for simulating natural, organic strokes, such as those seen in calligraphy or when drawing with varied pressure. The slider allows for fine-tuned customization, giving you full control over how much taper is applied to the start and end of your brush strokes.
Taper Size #
This setting controls the degree of the taper effect on your brush strokes. The larger the value, the greater the decrease in size at the end of the line. It allows you to customize the tapering effect, giving you more control over how your strokes appear and enabling you to achieve precise, graduated line thickness.
Anti-Concussion #
When enabled, this setting reduces the vibrations that occur during drawing, resulting in a smoother experience. While it slightly reduces the brush’s speed, the effect is minimal and not noticeable. Anti-Concussion is especially useful for high-speed strokes, as it helps eliminate excess movement, making your drawing more stable and controlled.
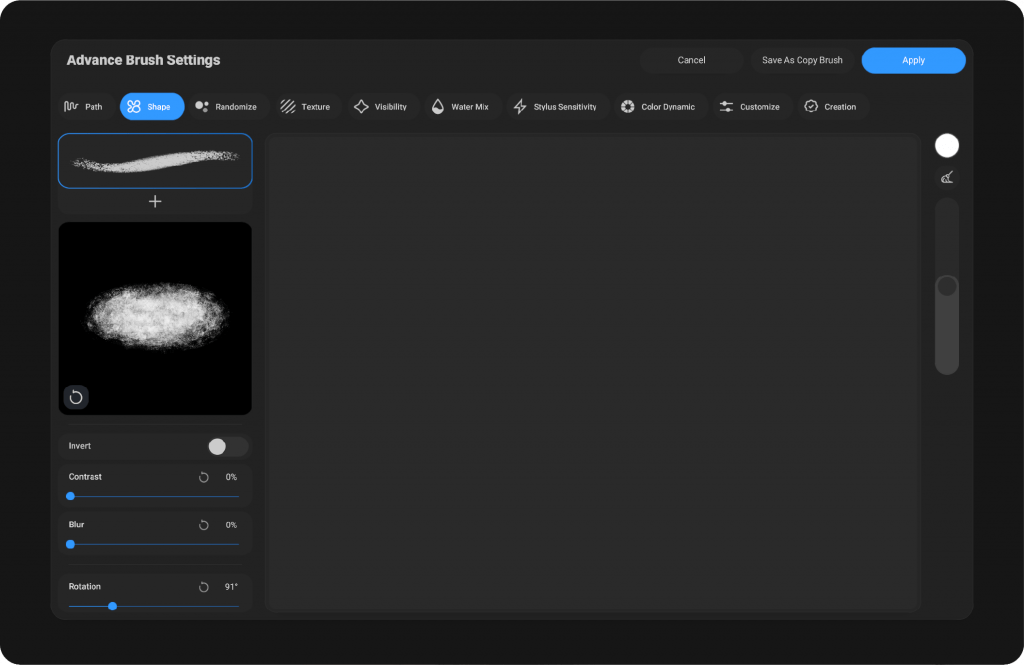
Shape #
The brush shape #
The Shape setting determines the fundamental structure of the brush’s stroke. By clicking on the square, the browser opens, allowing you to choose the desired shape for your brush. Once selected, the shape will appear inside the square, and you can easily reset it if needed.
The brush shape refers to the texture or pattern that defines the stroke’s appearance. It could be anything from a simple round shape to a more complex custom design. The user needs this setting to control how the brush interacts with the canvas, whether it’s for creating smooth, uniform lines or adding texture and variation to the stroke. Customizing the brush shape allows for greater flexibility and creativity in digital artwork, making it essential for artists who want to achieve specific effects or replicate traditional brush techniques.
To delete or reset the shape, simply click the icon at the bottom left of the square, next to the reset option. This will restore the default brush shape, which is a circle.
Invert #
This setting inverts the colors of the shape. It’s useful when the brush shape has a white background and a black shape. By inverting the colors, it ensures that the shape will be white and the background will be black, as this is the default requirement for creating shapes in the system.
Contrast #
The contrast setting allows you to adjust the difference between the dark and light areas of the brush shape. Increasing the contrast will make the dark areas darker and the light areas lighter, while decreasing it will soften the difference between the two.
Blur #
The blur setting controls the softness of the edges of your brush shape. Increasing the blur will create a smoother, softer edge for the brush, while lowering the blur will make the edges sharper.
Rotation #
The rotation setting lets you adjust the angle of your brush shape. By rotating the shape, you can customize the way the brush strokes appear.
Roundness #
Roundness refers to the circularity of the brush shape. Adjusting this setting will change the shape’s appearance, making it more round or more oval-shaped.
Rotation and Roundness Control #
This setting allows you to simultaneously adjust the rotation and roundness of the brush using a circular dial. Instead of using separate sliders, this feature lets you easily customize both aspects of the brush shape in one fluid motion, providing more intuitive control over the brush’s appearance.
Movement Rotation Control #
This setting controls how the brush rotates with the movement of the pen. As you move your pen, the brush will rotate accordingly, giving you more dynamic control over the stroke.
Flip X #
Flipping the brush shape horizontally, this option inverts the brush across the vertical axis.
Flip Y #
Flipping the brush shape vertically, this option inverts the brush across the horizontal axis.
Randomize #
The randomize setting introduces variation into the brush shape, making each stroke slightly different from the last. This can be used to create more natural, organic effects.
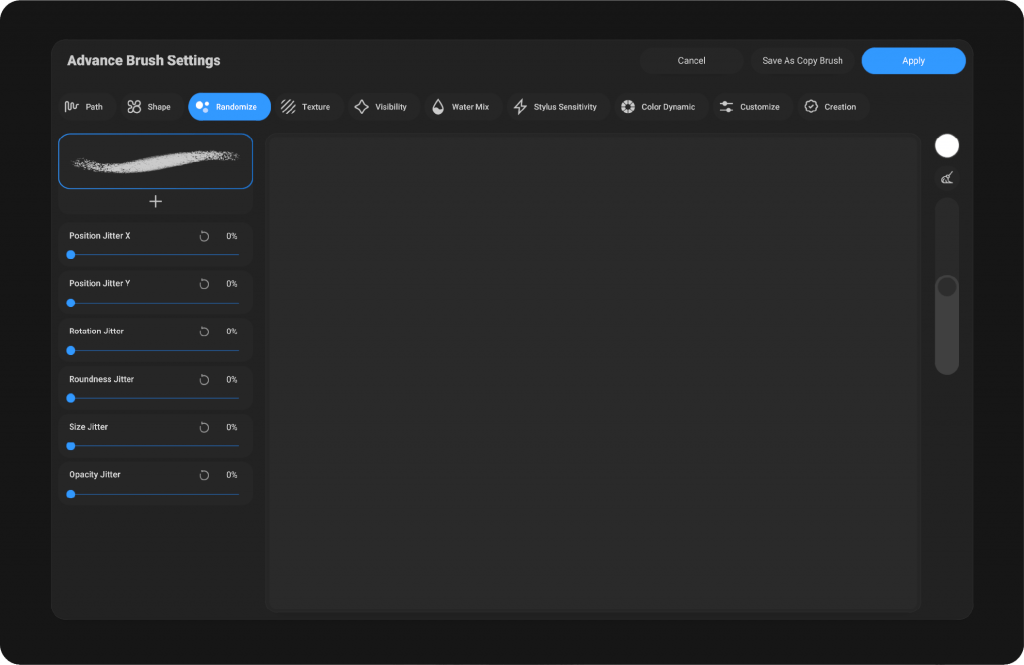
Randomize #
The Randomize feature introduces a level of unpredictability to your brush strokes, adding natural variation in key attributes. It includes the following options:
Position Jitter X #
Alters the horizontal position of your brush strokes randomly, creating slight shifts as you paint.
Position Jitter Y #
Randomly changes the vertical position of your strokes, adding organic movement to the path.
Rotation Jitter #
Introduces random rotations to the brush, making each stroke appear unique.
Roundness Jitter #
Randomizes the roundness of the brush tip, giving each stroke a slightly different shape.
Size Jitter #
Varies the size of the brush strokes at random intervals, adding dynamic variation to the stroke thickness.
Opacity Jitter #
Changes the opacity of the brush strokes randomly, providing a more dynamic and textured effect in your artwork.
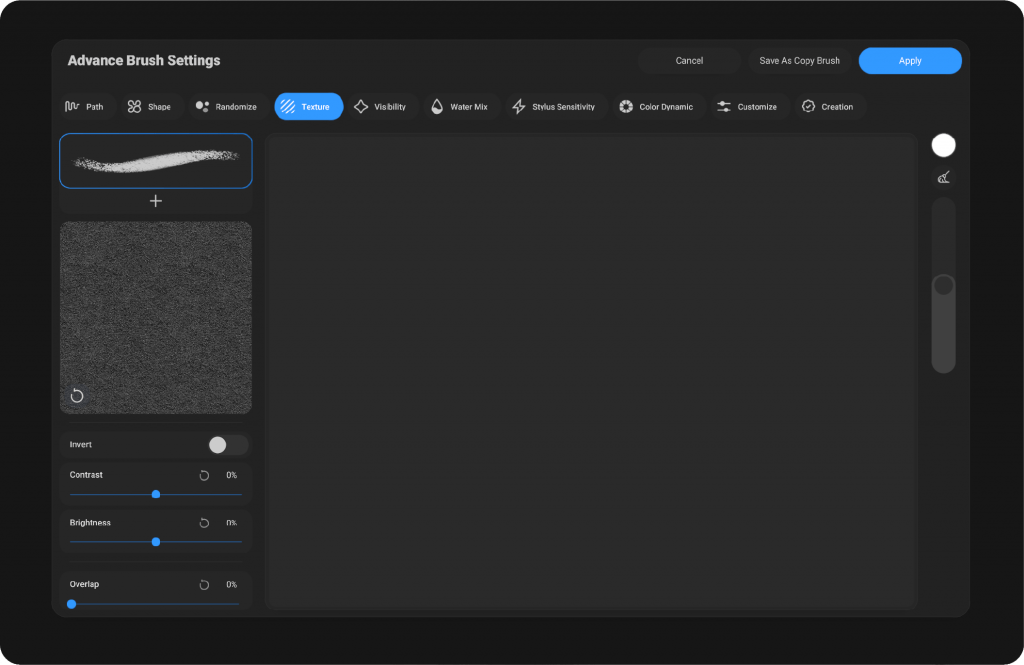
Texture #
The Texture setting allows you to apply a texture effect to your brush strokes, adding depth and detail to your artwork. By selecting a texture, you can simulate various surface effects, from rough to smooth, giving your brush strokes a more tactile, real-world feel.
The Brush Texture #
When you tap the Texture box, a browser will open, allowing you to choose and add a texture to your brush. A texture refers to the surface detail or pattern applied to the brush tip that can influence how the brush interacts with the canvas. Textures can simulate various materials like paper, fabric, or even grunge effects, adding depth and richness to your strokes.
Why Add a Texture?
Textures enhance the realism and character of your brush strokes. By applying a texture to your brush, you can achieve more natural effects, simulate traditional media, or introduce creative, stylized designs that can add interest to your artwork. Whether you’re creating rough pencil lines, smooth paint strokes, or anything in between, textures can elevate the final output and bring your work to life.
Texture Properties:
Grain and Surface Effect: The texture affects the visual feel of the brush, whether it gives a smooth finish or a more textured, grainy look.
Brush Interaction: The texture adjusts how the brush “feels” as it moves across the canvas, with variations in pressure affecting the depth of the texture applied.
Customizability: Textures can be scaled, rotated, and blended to fit the particular style you’re aiming for. You can also adjust how strongly the texture appears within your brush strokes.
Adding a texture to your brush opens up endless possibilities for creativity and customization, allowing you to refine the style of your artwork with more control and detail.
To delete or reset the Texture, simply click the icon at the bottom left of the square, next to the reset option. This will restore the default brush texture, which is empty.
Invert #
This setting inverts the texture’s colors. It’s useful when you need to reverse the texture, for example, if the texture is normally light and the background is dark, Invert will swap them, allowing you to create a contrast effect.
Contrast #
Adjusts the contrast of the texture. Increasing contrast makes the texture sharper, while decreasing it can soften the appearance, giving more subtlety to the brushstroke.
Brightness #
Controls the brightness of the texture. Increasing brightness lightens the texture, whereas decreasing it darkens the texture, allowing you to fine-tune the overall look.
Overlap #
Controls how much the texture repeats over the stroke. Higher overlap results in the texture being more densely packed, while lower overlap makes the texture appear more spaced out.
Scale #
Adjusts the scale of the texture. Increasing the scale enlarges the texture pattern, while decreasing the scale makes the texture smaller and finer, offering more control over the appearance.
Rotation #
This rotates the texture pattern, allowing you to adjust its angle for more dynamic brush effects. Rotation can be fine-tuned to fit the desired orientation of the texture.
Random Offset #
This setting randomizes the starting point of the texture with every new stroke. Instead of the texture repeating from the same origin, each stroke begins with a different offset, preventing visible patterns or repetition. This adds variety and makes the brush strokes feel more natural and less mechanical, enhancing the overall realism of textured painting.
Depth #
This setting influences the depth of the texture’s effect. It alters how the texture interacts with the stroke, giving it more dimension or flatness depending on the adjustment.
Texture Motion #
This switch enables the Texture Motion effect. When activated, it simulates a dynamic motion within the brush stroke, giving the impression that the texture shifts as you draw. This effect can add a sense of fluidity and movement to your brush strokes.
Sliding #
This effect simulates motion within the texture. It creates the illusion that the texture shifts as you draw, adding a dynamic feel to the stroke. This can enhance the brush’s natural movement.
Blur #
The Blur setting softens the texture, creating a smoother, less defined look. This is useful for blending the texture into the painting, making it less prominent.
Motion Blur #
Adds a motion blur effect to the texture, giving the illusion of speed or movement. This is especially useful for creating fast brush strokes or adding a sense of action to the artwork.
Motion Blur Angle #
Controls the direction of the motion blur effect. Adjusting the angle changes the orientation of the blur, allowing you to match the brush movement direction with the desired effect.
Texture Blending Mode #
This setting defines how the texture interacts with the brush shape. Different blending modes determine the way the texture combines with the stroke, affecting contrast, brightness, and the overall look of the paint. By experimenting with blending modes, you can achieve a wide range of effects—from subtle grain and shading to bold, high-contrast textures. This allows artists to fine-tune how the texture feels within each stroke, ensuring greater control and creative flexibility.
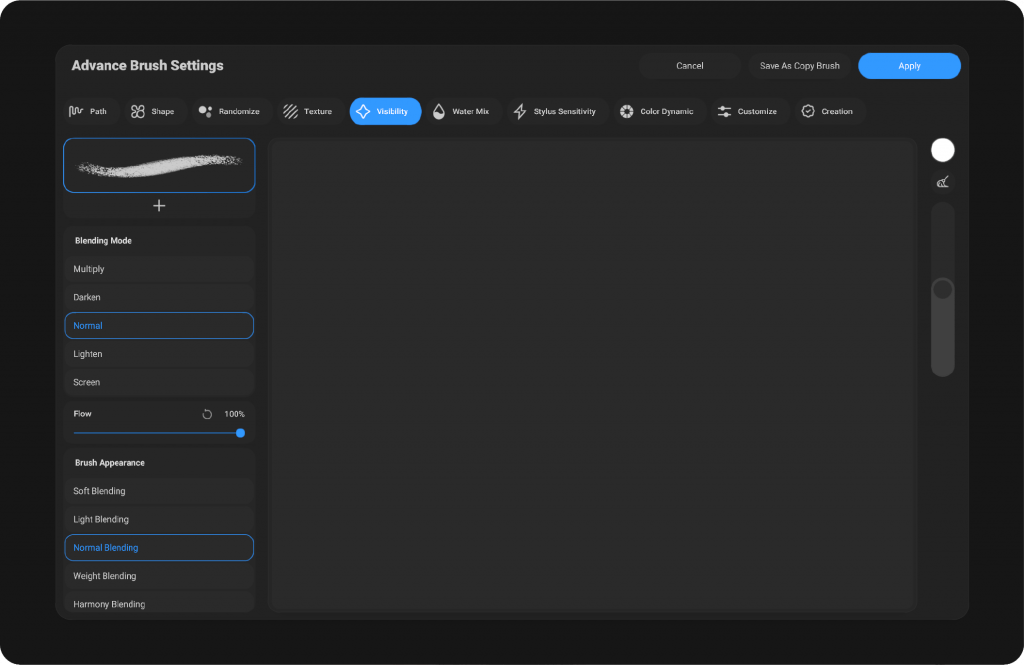
Visibility #
The Visibility section allows you to refine how your brush interacts with the canvas and other layers, providing greater control over the look and blending of your strokes. It includes three key settings that influence the final output of your brush
Blend Mode #
Blend mode determines how your brush color interacts with the underlying colors and textures. By selecting a blend mode, you can create various effects such as darkening, lightening, or adding texture to the brush stroke. This setting allows you to explore different visual effects by controlling how layers interact with one another.
Flow #
Flow regulates the intensity of the color applied with each brushstroke. A higher flow results in a more saturated stroke, while a lower flow leads to lighter, more translucent strokes. This allows you to have fine control over how much paint is applied with each stroke, making it ideal for both bold and subtle effects.
Brush Appearance #
This setting defines the overall look of your brush, including its texture, edge sharpness, and style. You can adjust these options to make your brush appear smoother, more detailed, or with varying edge softness, giving you the flexibility to achieve different artistic effects and enhance the appearance of your strokes.
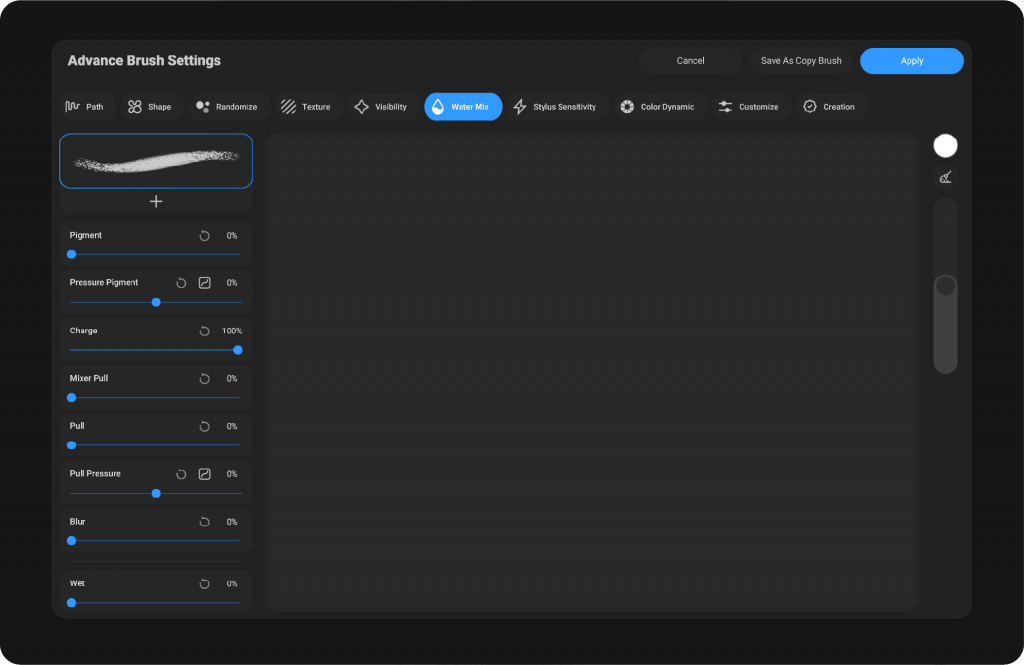
Water Mix #
The Water Mix setting allows you to simulate the blending effect of water on your brush strokes. When enabled, it creates a watercolor-like effect by mixing the brush color with the background or underlying layers. This adds a fluid, soft transition between colors, mimicking the behavior of wet paint. Adjusting the strength of the water mix can control how much the colors blend, giving you more control over the overall texture and appearance of your strokes.
Pigment #
Controls the amount of pigment released from the brush. Higher values reduce the pigment, resulting in lighter and less dense strokes, while lower values release more pigment, creating darker and richer strokes. This setting also depends on Charge—if the brush is fully charged and Pigment is low, you will get strong, color-filled strokes.
Pressure Pigment #
Adjusts how pen pressure affects pigment release. At positive values, stronger pressure reduces pigment, making the stroke lighter, while at negative values, stronger pressure increases pigment, making the stroke darker and more intense.
Charge #
Represents the amount of paint stored in the brush. At 100%, the brush is fully loaded and produces bold, rich strokes. Lower values simulate a brush that is running out of paint, creating lighter and faded effects.
Mixer Pull #
Determines how much of the existing color on the canvas is mixed into the new stroke. Higher values create stronger blending with the underlying paint, enhancing the watercolor mixing effect.
Pull #
Controls how far the paint is dragged along the stroke. Higher values smear and stretch the paint further, while lower values keep it more localized.
Pull Pressure #
Adjusts how pen pressure influences pull strength. Stronger pressure drags the paint further when values are high, while lighter pressure keeps strokes sharper and more contained.
Blur #
Softens the edges of the stroke by adding blur. Higher values simulate natural watercolor diffusion and edge softness.
Wet #
Adds the darkened edge effect typical of watercolor strokes, making edges more defined and giving a natural painted look.
Wetness #
Lightens the inside of the stroke as the value increases, while keeping the edges darker and well-defined. This creates a realistic watercolor effect where the center of the paint appears diluted but the edges remain strong.
Wet Edges Jitter #
Introduces randomness to the wet edge effect. Higher values create irregular, organic edges, closely mimicking the unpredictable flow of watercolor on paper.
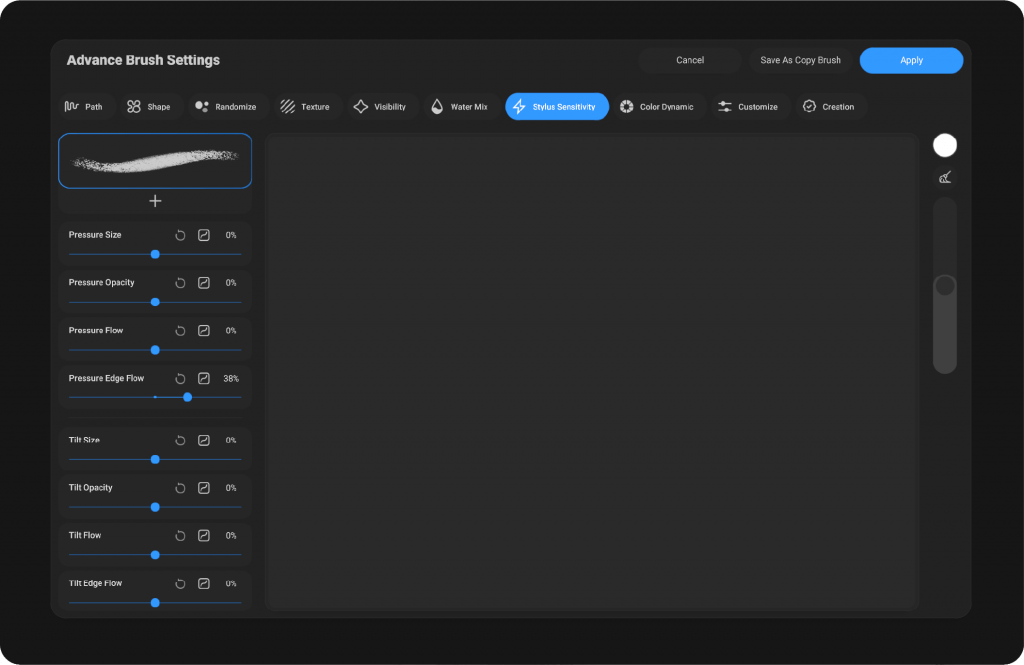
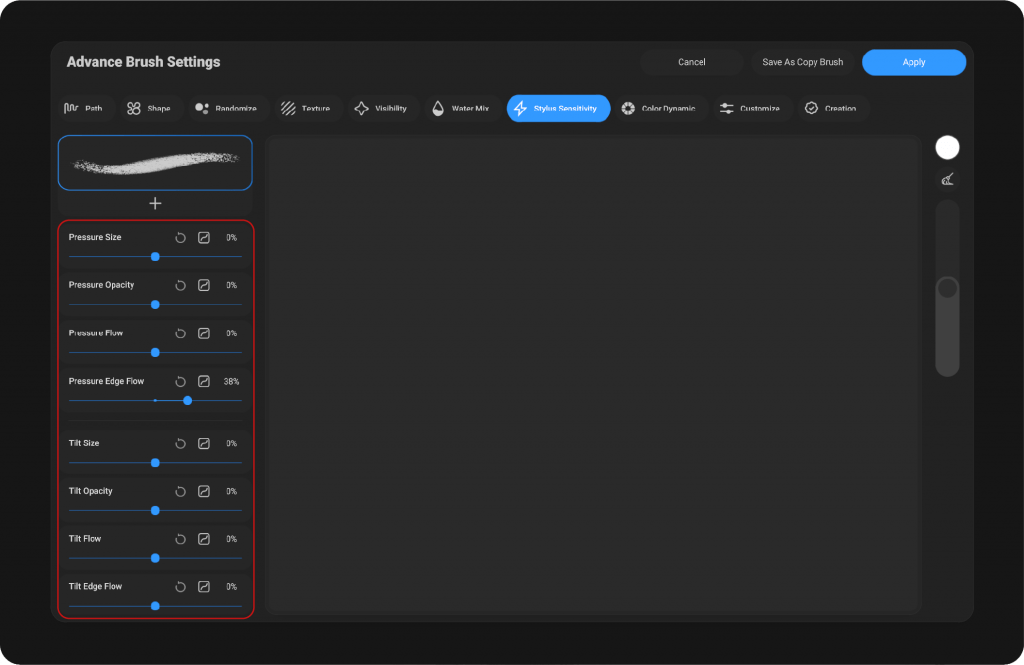
Stylus Sensitivity #
controls how responsive the brush is to the pressure and tilt of your stylus. This setting determines how much the brush stroke will vary based on the pressure you apply while drawing.
Pressure Size #
This setting determines how much the size of your brush changes based on the pressure you apply. Higher pressure will result in a larger stroke, while lighter pressure will make the stroke smaller.
Pressure Opacity #
Controls how the opacity of the brush is affected by pressure. More pressure will result in a more opaque stroke, while lighter pressure will create a more transparent stroke.
Pressure Flow #
This setting adjusts the flow of the brush, affecting how much paint is applied to the canvas based on the pressure you exert. More pressure results in a faster flow, creating thicker strokes, while lighter pressure slows down the flow.
Tilt Size #
Defines how the size of the brush changes based on the tilt of your stylus. Tilting the pen will make the stroke either larger or smaller, depending on the sensitivity.
Tilt Opacity #
This setting adjusts how the opacity of the brush is influenced by the tilt of the stylus. Tilting the pen changes the transparency of the stroke.
Tilt Flow #
Determines how the flow of the brush is influenced by the tilt angle of your pen. More tilt results in a greater or lesser paint flow, based on the setting.
Tilt Roundness #
Affects how the roundness of the brush changes as you tilt the pen. This can give you a more dynamic brushstroke as you adjust your tilt.
Speed Size #
Adjusts the size of the brush based on the speed at which you move your stylus. Faster movements will result in smaller strokes, while slower movements produce larger strokes.
Speed Opacity #
Controls how the opacity of the brush varies with the speed of your stylus movement. Fast strokes will be more opaque, while slower strokes may be more transparent.
Speed Flow #
This setting alters how the flow of paint changes with the speed of your brush strokes. Moving quickly will decrease the flow, while slower strokes will increase the flow of paint, allowing for more detail or coverage depending on your movement speed.
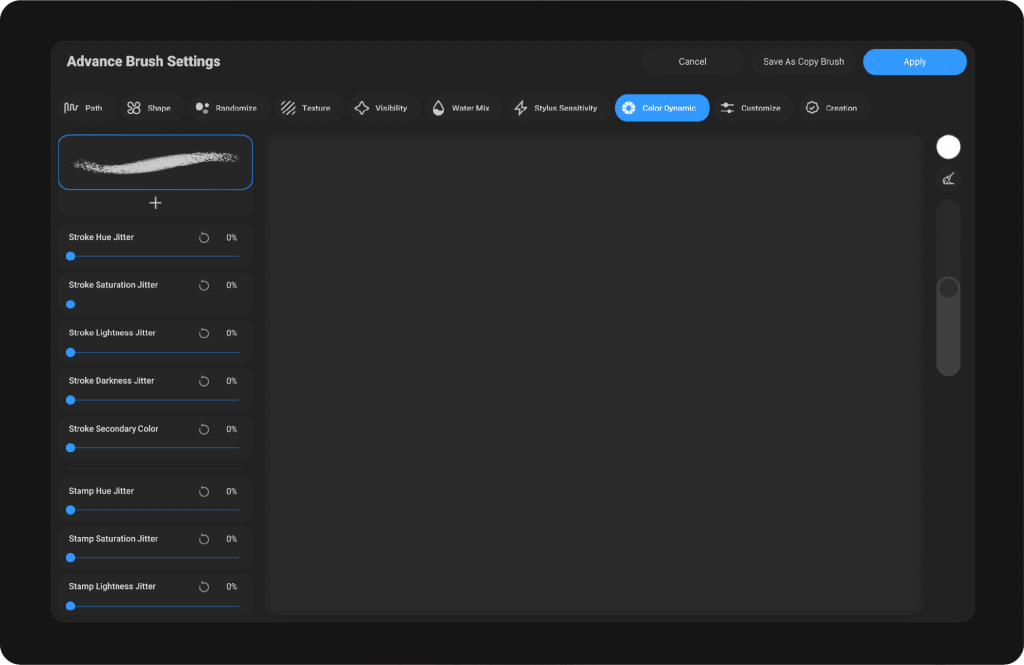
Color Dynamics #
The Color Dynamics section in your brush settings allows you to add a variety of color variations to your strokes. This feature helps create more vibrant and dynamic brushwork by introducing subtle shifts in color as you paint. You can control different attributes like Hue, Saturation, and Brightness, which will adjust the color of your brush based on parameters such as pressure, speed, and tilt.
By using Color Dynamics, your brush strokes won’t be uniform in color, creating more natural and visually interesting results. Whether you’re looking to simulate traditional painting effects or just want to add a bit of unpredictability to your digital art, the Color Dynamics feature is an essential tool to enhance your creative process.
Stroke HUE Jitter #
This setting controls the variation of the hue (color) of the stroke as you paint. It allows you to create more dynamic and colorful strokes by changing the hue randomly.
Stroke Saturation Jitter #
This adjusts the saturation (intensity) of the stroke’s color. It introduces variation in how vibrant or muted the color appears in the stroke.
Stroke Lightness Jitter #
This changes the lightness (brightness) of the color in your stroke, adding randomness to how dark or light the color is as you paint.
Stroke Darkness Jitter #
Similar to Lightness Jitter, this adjusts the darkness of the stroke’s color, creating variability in the stroke’s tone.
Stroke Secondary Color #
This adds a secondary color to the stroke, enabling you to blend or layer colors for a more complex effect.
Stamp HUE Jitter #
This setting allows you to vary the hue of the brush stamp (the shape or pattern of the brush) on each stamp, giving more variety to the color each time the brush is applied.
Stamp Saturation Jitter #
Similar to the Hue Jitter, this variation introduces random changes in saturation for each stamp of the brush.
Stamp Lightness Jitter #
This controls the variation in lightness of the stamp, allowing you to have different brightness levels for each brush stroke.
Stamp Darkness Jitter #
This setting allows you to vary the darkness of the stamp in each stroke, making the brush appear darker or lighter depending on the jitter value.
Stamp Secondary Color #
This introduces a secondary color into the stamp itself, similar to the Stroke Secondary Color setting, allowing for more complex color transitions.
Pressure HUE Jitter #
This setting controls the hue variation based on the pressure you apply with your stylus, giving you more control over color shifts while painting.
Pressure Saturation Jitter #
With this setting, the saturation of the color changes based on the pressure applied, creating variations in the color’s intensity as you paint with more or less pressure.
Pressure Lightness Jitter #
This introduces changes to the lightness of the stroke based on how hard or soft you press with your stylus.
Pressure Darkness Jitter #
This setting adjusts the darkness of the color depending on the pressure you apply, adding subtle tonal changes to your stroke.
Pressure Secondary Color #
This allows for changes to the secondary color based on pressure, adding an extra layer of color variation as you paint.
Tilt HUE Jitter #
This setting alters the hue of the color based on the tilt of the stylus, adding further variability and richness to your brush strokes.
Tilt Saturation Jitter #
Changes the saturation of the color based on the tilt of the stylus, giving you additional control over the intensity of your stroke.
Tilt Lightness Jitter #
This allows for changes to the lightness of the color based on the tilt of your stylus, creating varied brightness in your strokes.
Tilt Darkness Jitter #
This setting adjusts the darkness of the color based on the tilt of your stylus, allowing for tonal variation as you tilt your pen.
Tilt Secondary Color #
This allows for the secondary color to change based on the tilt of the stylus, further adding to the complexity and fluidity of your brushwork.
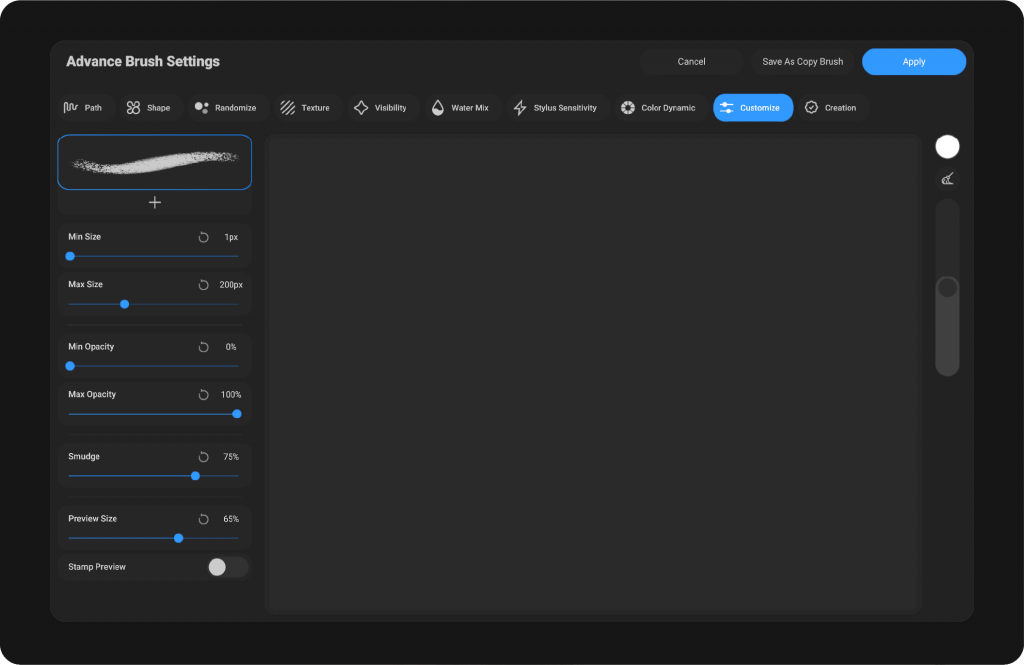
Customize #
The Customize section provides you with a set of adjustments that allow you to fine-tune the behavior of your brush in terms of size, opacity, and smudging effects. Here are the available settings:
Min Size #
This controls the minimum size the brush can reach. Setting a lower value for Min Size ensures that the brush can get smaller, allowing for finer strokes and more detailed work.
Max Size #
This determines the maximum size the brush can reach. Setting a higher Max Size gives you the flexibility to create larger strokes, useful for broader coverage and bold lines.
Min Opacity #
This adjusts the minimum opacity of the brush stroke. The lower the value, the more transparent the brush will be at its smallest opacity setting, useful for subtle, layered strokes.
Max Opacity #
This sets the maximum opacity of the brush stroke. A higher Max Opacity value allows for fully opaque strokes, ensuring you get solid, vibrant colors when needed.
Smudge #
The Smudge setting lets you control how the brush interacts with the underlying pixels, simulating a smudging effect. This setting is useful for blending colors or softening edges in your artwork.
Preview Size #
This controls the size of the brush preview shown in the interface. A larger preview gives you a better view of the brush’s current size, making it easier to adjust as you work.
Stamp Preview #
The Stamp Preview shows the brush’s stamp shape and how it will appear when applied to the canvas. It provides a visual representation of the brush’s pattern, allowing you to see how the brush will behave in real-time before using it.
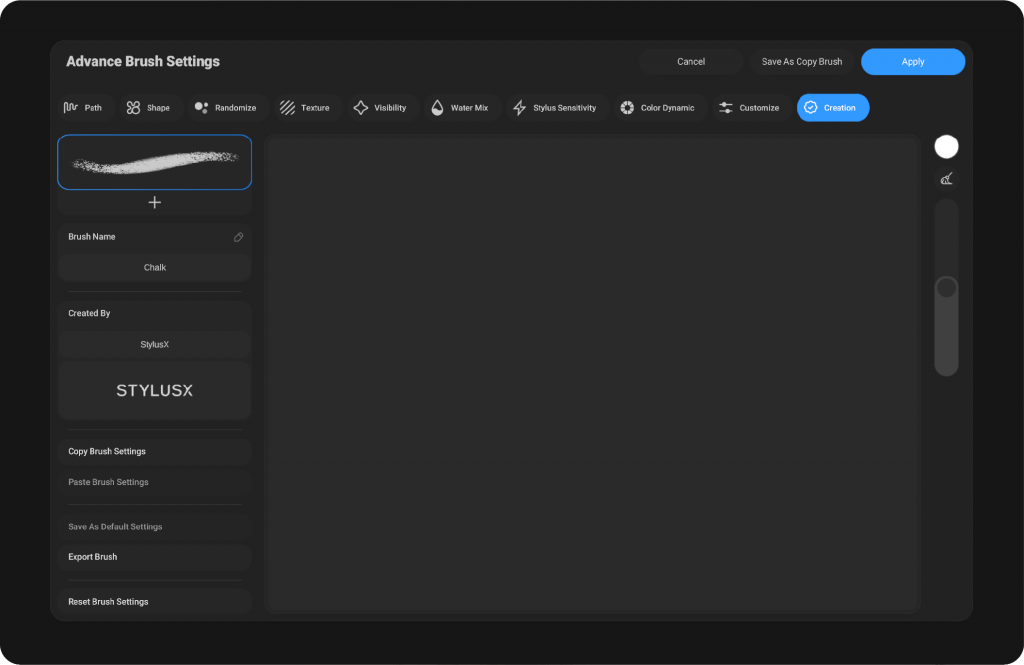
Creation #
contains settings related to creating, saving, and sharing the brush:
Rename: #
By clicking on the pencil icon, you can modify the brush name. This is useful for organizing and customizing your brushes to easily identify them later.
Created By #
Displays the name of the person who created the brush.
Name: Customize the name of the brush here.
Signature: Allows you to add a custom signature for the brush.
Copy Brush Settings #
Copy the current brush settings to apply them later to another brush.
Paste Brush Settings #
Paste previously copied brush settings.
Save As Default Settings #
Save the current settings as the default for the brush.
Export Brush #
Export the brush for use in other projects or to share.
Reset Brush Settings #
Reset the brush settings to their default values.
Dual Brush #
The Dual Brush feature in StylusX allows you to combine two brushes for more complex and dynamic effects. When you open the Advanced Brush Settings, you’ll notice a preview of the brush at the top-right corner. Below the preview, there is a plus icon.
By tapping on this icon, you can add a secondary brush to work alongside your primary brush. The secondary brush has its own unique settings, separate from the primary brush, allowing you to adjust them independently. This flexibility enables the creation of a dual brush, where both brushes work together with their respective settings to achieve intricate and layered brush strokes.
The result is a more versatile brush that can produce effects and textures impossible with a single brush, enhancing your creative possibilities.
Blend Mode #
When you tap on either the primary or secondary brush preview, a Blend Mode option will appear between them. This allows you to control how the two brushes interact with each other, giving you more flexibility and creativity in your strokes. By adjusting the blend mode, you can create unique effects based on how the two brushes blend together, adding depth and complexity to your artwork.
Delete secondary Brush #
To delete the secondary brush, simply swipe left on the secondary brush preview. An icon of a trash can will appear, allowing you to either tap it to delete the brush or continue swiping to drop and remove it.
Please note that this action is irreversible and cannot be undone. The primary brush cannot be deleted, only the secondary brush can be removed in this way.


